
Desserts
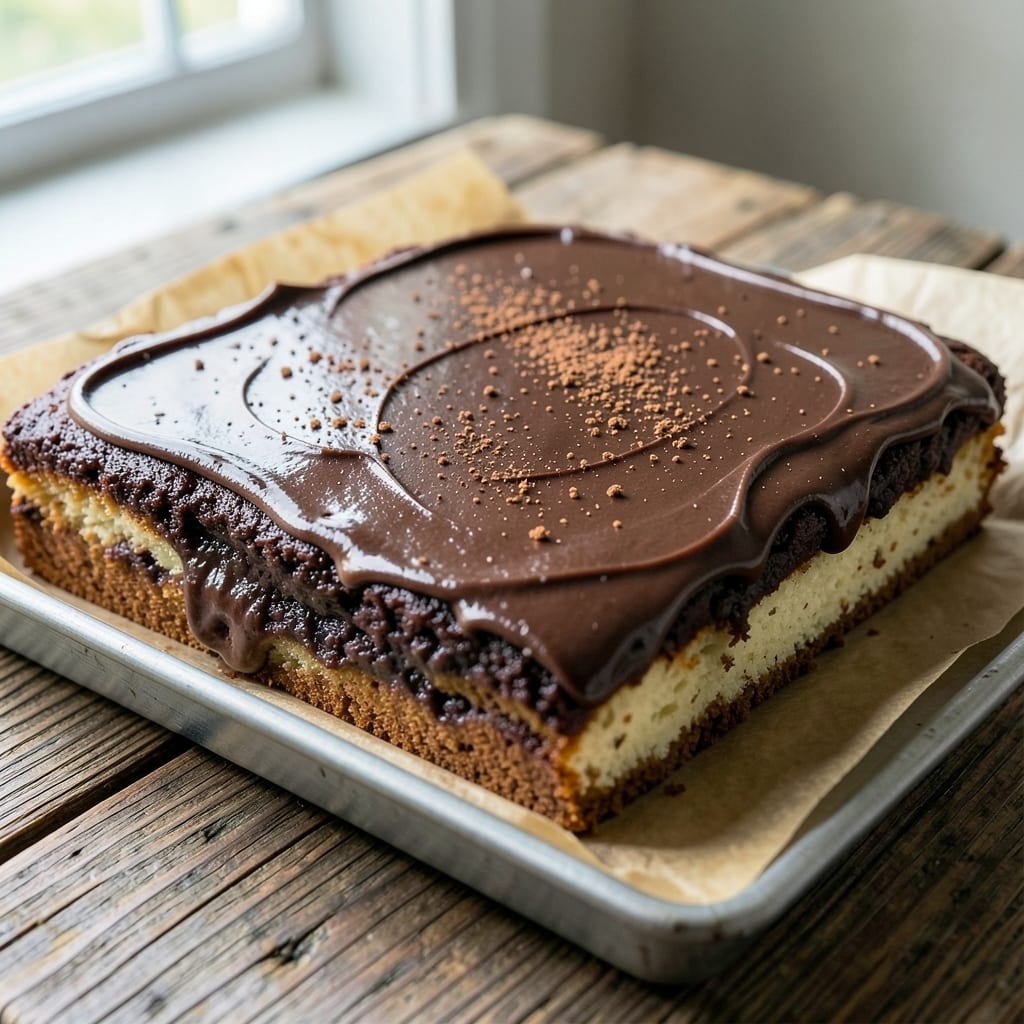
This 12x18 chocolate sheet cake recipe delivers a showstopping dessert with a fudgy crust and swirling vanilla buttercream rivers—perfect for parties, potlucks, or family gatherings. The secret lies in a precise balance of cocoa powder and melted butter for that signature dense texture, while the buttercream adds a professional touch without requiring piping skills.
Baking this sheet cake is simpler than it looks: a single-layer design means no fussing with layers or tricky assembly. The recipe uses standard kitchen tools—mixing bowls, a sheet pan, and basic measuring cups—so you won’t need specialty equipment. Preheat your oven to 350°F, and you’ll have a crowd-pleasing dessert ready in under an hour.
What sets this apart is the vanilla buttercream rivers—thick, creamy swirls that add visual drama while keeping the cake moist. The contrast between the rich chocolate base and the smooth frosting makes every slice feel special, whether served at a celebration or as a decadent after-dinner treat.
For extra flair, dust with powdered sugar or add sprinkles before cutting. This recipe scales easily for larger crowds, and leftovers? They disappear just as fast as they’re made. Let’s get baking!
Ingredients for 12x18 chocolate sheet cake
Precision ingredients for a showstopping chocolate sheet cake with professional buttercream swirls.
| Ingredient | Amount | Notes |
|---|---|---|
| All-Purpose Flour 🌾 | 2 ½ cups | Sifted for even texture |
| Unsalted Butter 🧈 | 1 ½ cups | Melted, cooled slightly |
| Granulated Sugar 🍚 | 2 cups | White or light brown |
| Cocoa Powder 🍫 | ¾ cup | Dutch-processed preferred |
| Large Eggs 🥚 | 2 whole | Room temperature |
| Vanilla Extract 🌿 | 2 tsp | Pure, high-quality |
| Baking Soda 🧂 | ½ tsp | Pure, not baking powder |
| Salt 🧂 | ½ tsp | Fine sea salt |
| Milk 🥛 | 1 cup | Whole for richness |
| Vegetable Oil 🫒 | ½ cup | Light or neutral flavor |
| Powdered Sugar 🍚 | 4 cups | For buttercream |
| Unsalted Butter 🧈 | 1 cup | Softened for buttercream |
| Heavy Whipping Cream 🥛 | 1 cup | Chilled for stability |
| Vanilla Extract 🌿 | 1 tsp | For buttercream |
The cocoa powder is non-negotiable—Dutch-processed delivers that signature deep chocolate flavor without bitterness. Penzeys or Ghirardelli are my go-tos for quality, but any high-quality brand works. For the butter, Plugrá or Land O’Lakes are reliable choices, but the difference between brands is minimal here. The powdered sugar should be fine and sifted—lumps will ruin the buttercream’s silky texture. Pre-sift your flour and cocoa powder to avoid dense spots in the cake.
No Dutch-processed cocoa? Natural cocoa powder plus 1/4 tsp baking soda mimics the flavor profile. Running short on vanilla extract? Vanilla bean paste at half the amount works beautifully. For the buttercream, if you can’t find heavy whipping cream, 35% whipping cream from the international aisle gives better results. The milk can be swapped for evaporated milk or cream—just ensure it’s full-fat—but whole milk keeps the cake moist without altering the texture. Always use room-temperature eggs to prevent lumps in the batter.
Store the cake base in an airtight container at room temperature for up to 3 days, though it’s best enjoyed fresh. The buttercream should be refrigerated between uses and brought to room temperature before spreading. For longer storage, wrap the entire cake in plastic wrap and refrigerate for up to 1 week. Freeze the cake base (unfrosted) for 3 months—thaw at room temperature before adding the buttercream. The buttercream can be made a day ahead and stored in the fridge, but let it sit at room temperature for 30 minutes** before using for optimal spreadability.
Why You'll Love This Recipe
- Sheet Pan Simple: I swear by this recipe when I’m too tired to deal with layers or frosting—just mix, bake, and you’ve got a whole cake in one pan. The butter and sugar combo makes it rich without needing extra fat, and the eggs hold it together like glue.
- Fudgy Magic: That cocoa powder isn’t just any cocoa—it’s the real deal, deep and velvety, not bitter or chalky. The sugar melts into the butter just right, giving every bite that perfect balance of sweet and chocolatey punch.
- Party or Snack: Between us, this cake is my secret weapon for birthdays, potlucks, or just when I need a treat. Cut into squares and it’s a crowd-pleaser—no one will guess it’s this easy to make. (Yes, even on a Tuesday night.)
- Budget Bake: I use this recipe all the time because it’s cheap to make but feels special. A stick of butter, a bag of sugar, and a box of cocoa stretch far, and leftovers? They disappear faster than I can say “seconds, please.”
Step-by-step instructions for 12x18 chocolate sheet cake
Master this technique and you'll achieve a perfectly fudgy chocolate crust with silky vanilla buttercream rivers every time.
Prepare Your Pan and Preheat the Oven
Line a 12x18-inch half sheet pan with parchment paper, leaving an overhang on all sides for easy removal. Lightly grease the parchment with vegetable oil using a pastry brush, focusing on the edges where the cake often sticks. Preheat your oven to 350°F with the rack positioned in the center.
This preparation ensures even baking and prevents the cake from cracking or sticking. I always use parchment paper instead of greasing the pan directly—it creates a nonstick barrier while allowing the cake to develop that perfect crust. Let the oven preheat for at least 20 minutes before baking to ensure consistent temperature throughout.
Mix the Cake Batter for Maximum Moisture
In a large mixing bowl, combine the 2.5 cups all-purpose flour, 0.5 tsp baking soda, and 0.5 tsp salt. Whisk these dry ingredients together until fully blended and set aside. In a separate bowl, measure out the 2 cups granulated sugar, 0.75 cup cocoa powder, and 2 tsp vanilla extract.
In a medium saucepan, melt the 1.5 cups unsalted butter over low heat until completely liquid, then remove from heat and let cool slightly. Add the 2 whole large eggs and 1 cup milk to the melted butter, whisking until smooth. Gradually pour in the sugar-cocoa mixture while whisking continuously. Finally, incorporate the dry ingredients into the wet mixture using a spatula, mixing just until combined.
This method creates a dense, fudgy texture by ensuring even distribution of cocoa and proper hydration. Avoid overmixing—the batter should be thick but pourable, with no visible flour streaks remaining.
Bake the Chocolate Sheet Cake to Perfect Doneness
Pour the batter evenly into the prepared pan and spread it into the corners using a spatula. Tap the pan gently on the counter a few times to remove any air bubbles. Bake in the preheated oven for 25-30 minutes, until a toothpick inserted in the center comes out with moist crumbs but no wet batter.
The cake should have a slightly domed center with edges that pull away from the pan. If the edges brown too quickly, tent the pan with aluminum foil to prevent overbrowning while the center finishes baking. I always check for doneness at the 25-minute mark—this cake bakes faster than traditional sheet cakes due to its rich chocolate content.
Prepare the Vanilla Buttercream Rivers
While the cake bakes, prepare the buttercream by beating the 1 cup unsalted butter and 4 cups powdered sugar together until light and fluffy. Add the 1 cup heavy whipping cream and 1 tsp vanilla extract, beating until smooth and creamy. Chill the buttercream in the refrigerator for 15-20 minutes to firm up slightly before using.
This buttercream should be thick enough to hold its shape when piped but still spreadable. The chilling step prevents the buttercream from melting too quickly when applied to the warm cake. For the classic "rivers" effect, pipe vertical lines of buttercream about ½ inch apart on top of the warm cake, then use an offset spatula to spread it into elegant swirls.
Cool and Serve for Maximum Flavor Impact
Remove the cake from the oven and let it cool in the pan for 10 minutes, then transfer to a wire rack to cool completely. Once fully cooled, carefully lift the cake using the parchment overhang and place it on a serving board. Use a serrated knife to trim any uneven edges if needed.
The cake should be moist and fudgy with a crackly top crust. The buttercream rivers should look glossy and professional. Serve at room temperature for the best texture contrast between the dense chocolate cake and light buttercream. This cake keeps well at room temperature for 2 days or can be refrigerated for up to 5 days, though it's best enjoyed fresh.
Pro Tips For Making 12x18 Chocolate Sheet Cake
- Melt Butter Slowly: I learned this the hard way—dumping cold butter into hot liquid makes weird lumps that never fully incorporate. Warm the butter in the microwave for 20 seconds first, then stir it into the sugar until it’s completely smooth before adding anything else.
- Sift That Cocoa: That powdered cocoa? Don’t just eyeball it. Sift it directly into the dry ingredients with the flour—this keeps the texture light and prevents those dreaded dense pockets. (Yes, even if you’re impatient like me.)
- Check Internal Temp: That cake might look done, but chocolate sheet cakes hide their moisture. Use an instant-read thermometer—pull it at 205–210°F for a perfect crumb. If you wait for the toothpick test, you’ll overbake it every time.
- Whip Eggs Separately: Beat the eggs with the sugar first, then fold in the butter mixture—this keeps the batter airy. I was skeptical until I tried it: the difference in rise is noticeable, especially in a big 12x18 pan where edges dry out faster.
Make-ahead tips for 12x18 chocolate sheet cake
Prep Ahead Timing
Make the buttercream up to 2 days ahead and store it in an airtight container in the fridge. Bring it to room temperature before using—this ensures it spreads smoothly over the cake. I always prep mine the night before so it’s ready to go in the morning. The cake batter, however, should never be mixed ahead of time as it loses moisture and structure. 💫
Freezer-Friendly Base
Bake the cake base and cool it completely, then wrap it tightly in plastic wrap followed by aluminum foil. Freeze for up to 3 months—this preserves its fudgy texture perfectly. When ready to serve, thaw at room temperature for 2-3 hours before adding the buttercream. This is a lifesaver for last-minute parties or when you know you’ll have leftovers. ❄️
Layering for Events
For large gatherings, bake two 12x18-inch cakes and layer them with an extra layer of buttercream in between. Stack them after both have cooled completely, then cover with additional buttercream rivers. Use a long serrated knife to cut clean slices. This creates a stunning presentation while keeping the cake manageable for serving. 🍰
Transport Tips
If you need to transport the cake, assemble it completely and wrap it tightly in plastic wrap, then place it in a sturdy cake box. For short trips (under 2 hours), room temperature is fine. For longer trips, keep it refrigerated until ready to serve. The buttercream stays stable, and the cake won’t dry out. Always transport horizontally to prevent shifting. 🚗
Make-Ahead Serving
For a stress-free serving experience, assemble the cake 4-6 hours ahead of your event. Store it in an airtight container at room temperature—this gives the flavors time to meld beautifully. If serving outdoors, keep it in a cool, shaded area until the last minute to prevent melting. The buttercream will soften slightly but still look gorgeous. 🌞
Portioning for Parties
Use a pizza cutter to slice the cake into 12 equal rectangles (about 3x4 inches each). This makes serving effortless and ensures everyone gets a fair portion. For a more elegant touch, use a long serrated knife and dust the cuts with powdered sugar immediately after slicing. Pre-portioning also helps with clean-up later! 🎉
Nutrition facts
Frequently asked questions
Can I substitute Dutch-processed cocoa powder?
Yes, but you'll need to adjust slightly. Use natural cocoa powder plus an extra ¼ tsp baking soda to mimic the flavor profile. The baking soda neutralizes the acidity in natural cocoa, giving you that same rich chocolate taste. Just be sure to sift both ingredients together for even distribution in the batter.
How do I prevent cracks in my chocolate sheet cake?
Cracks happen when the cake bakes too quickly. To avoid them, bake at 350°F and tent the pan with aluminum foil if the edges brown too fast. Also, make sure your oven is fully preheated before adding the cake. Tap the pan gently on the counter after pouring the batter to release air bubbles, which helps create an even surface.
Can I make this cake in a 9x13-inch pan instead?
Yes, but you'll need to adjust the baking time and buttercream quantity. Reduce the oven temperature to 325°F and bake for 35-40 minutes. The cake will be thicker, so check for doneness with a toothpick. For the buttercream, use about 2.5 cups total instead of 4 cups. The flavor will be just as rich!
How do I get the buttercream rivers to look professional?
Chill your buttercream for 15-20 minutes before using so it holds its shape. Pipe vertical lines about ½ inch apart on the warm cake, then use an offset spatula to gently spread and swirl. Work quickly while the cake is still slightly warm to create smooth, elegant patterns. A little practice makes perfect!
Can I add mix-ins like nuts or chocolate chips?
Fold in ½ cup chopped walnuts or pecans or 1 cup chocolate chips to the batter before baking. For even distribution, gently stir them in by hand after mixing all other ingredients. Keep the portion small—too many mix-ins can make the cake dense.